Posts

Paper Crane Pattern

Image
  Free Pattern: Us 5.5 mm or 5.00 mm crochet hook Size 4 medium worsted weight yarn This is done in only two parts that are easy and then really easily sewn together. Thie requires no stuffing. Wings and Body: magic circle or chain 4 and slip stitch into the first chain. Row 1: work 6 single crochets into the circle. (6) Row 2-9: Increase only the first stitch of every round and work regular single crochets around. (14) Row 10-18: Work a single crochet all the way around. (14) 19-26: Decrease only the first two stitches (combining them together) and then work the rest of the stitches as regular single crochets. (6) Row 27: Work a single crochet into every stitch. Fasten off and sew the whole closed.  Head and Tail: Magic ring or chain 4 and slip stitch into the first chain.  Row 1: Work 6 single crochets into the circle. Row 2-21: Work a single crochet into each stitch. Row 22: Single crochet 3, chain 1, and turn. Row 23-24: Work 3 single crochets chain 1 and turn. Row 25: Single cro

Winnie The Pooh Granny Square Blanket

Image
  Back a year or so ago did a series on TikTok where I made socks themed with colors based on characters. I was considering doing it again but did not know if I could focus on the socks long enough, then I thought everyone loves blankets. I had this great idea to make a universal pattern/idea that I would work with any theme or inspiration. With a little trial and error, I came up with this 6 square granny blanket that s about the size of a lap blanket depending on your tension. Each granny square has 10 rows as well as the border row that connects them all. After doing the themed colors choose a matching color for the outside and started another row on each. When I get to the side to connect instead of chaining between each I place the hook through the chain on the other square, yarn over, and pull through to connect. Oh, and for each square, I make the first letter of the character's name to make it a little more personalized. For this little series, I will be making TikTok's

Mushroom Lighter Holder Pattern

Image
  Free Pattern: Us 5.5 mm or 5.00 mm crochet hook Size 4 medium worsted weight yarn The Stem of Mushroom: Make a magic ring or chain 4 and slip stitch into the first chain to create a circle. Row 1: Chain 1. Place 9 single crochets into the circle. Row 2-13: Work a single crochet into every stitch. Row 14: Chain 100 and slip stitch to the opposite side of the stem. Fasten off. The Cap of Mushroom: Chain 8 and slip stitch into the first chain. Row 1: Chain 1. Place 11 single crochet into the circle. Row 2: Increase every stitch by placing two single crochets into each stitch. Rows 3-6: Place a single crochet into each sitch Row 7: For the look in the picture repeat row 3. (if you want a more rounder look decrease all stitches by combining two stitches together all the way around.) Slip stitch and fasten off. If you want dots on your mushroom for more of a Mario look this is what I recommend. Make a magic circle or chain 4 and slip stitch into the first chain. Row 1: Place 10 single cr

Jar Of Hearts And Heart Applique Pattern

Image
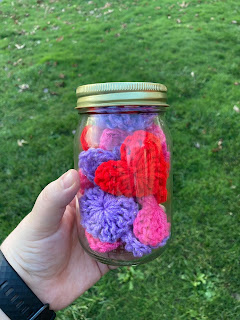
Free Pattern: Us 5.5 mm or 5.00 mm crochet hook Size 4 medium worsted weight yarn Heart Pattern: This pattern is worked in all one row so I am going to list the steps in an ordered list but everything is worked in the circle. Magic circle or chain 4 and slip stitch into the first stitch. Chain 3 3 triple crochets 3 double crochets chain 1 1 triple crochet chain 1 3 double crochet 3 triple crochet Chain 3 and slip stitch into the circle and fasten off. I personally tie the two ends together and use them to tie them onto something or cut them off. Well, this is later Carolann and all of this was a waste of time. This is still a cute idea and a great pattern but he did not appreciate any of it really, hated one thing I made him, wanted to throw it away but wouldn't give it back, and then broke up with me a few months later to be with his best friend. Not to be one of those downers but not everyone is going to appreciate your work. Which sucks and hurts and if anyone else has felt th

Granny Bucket Hat Pattern

Image
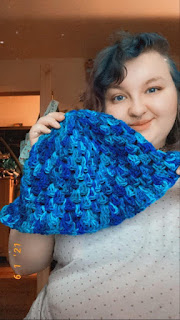
Free Pattern: Us 5.5 mm or 5.00 mm crochet hook Size 4 medium worsted weight yarn Make a magic circle or chain 4 and slip stitch into the first chain. Row 1: Place 10 single crochets into the circle. Row 2: Place 2 double crochets into each stitch (20). Row 3: Place a granny stitch cluster (3 double crochets all in the same spot) between every other set of two double crochets (10 granny square clusters.) Do not chain in between clusters! Row 4: Place a granny cluster between each previous cluster. Row 5: Increase all clusters. Into each opening place two clusters (20 clusters) Row 6-14: place a single granny cluster between each previous cluster like a regular granny square worked in rounds (20 clusters in each round, so between every 3 double crochets.) Row 15: Increase all granny clusters (40 granny stitch clusters) Row 16: Place a granny cluster between every previous cluster (40 granny clusters) Every starting stitch you add ads about an inch to the main part of the hat. I am goi

Door Decoration Pattern

Image
  Free Pattern: Us 5.5 mm or 5.00 mm crochet hook Size 4 medium worsted weight yarn Start with chain 4 or a magic circle. (To begin each row chain 3 as the first double crochet) For any granny stitch-related pattern, when you slip stitch at the end of the row, you will also slip stitch across the cluster into the next opening where you will start your row with a chain 3. Row 1: Chain 3 (counts as double crochet) and place 2 double crochets into the center, chain 2. Then place 5 granny clusters into the circle. For a total of 6 clusters. (each cluster being 3 double crochets with chain 2 between each cluster.)  Row 2: This is an increase row, place two clusters into each opening. Row 3-4: Because we are not working a square we will place one cluster into each opening. (To try and make it look like a w3reath I changed the color on the 4th row (1, 2, and 3 are white)) Row 5: This is another increase row, place two clusters into each opening. Row 6: Place a single cluster into each openi

Wrist Cuff Pattern

Image
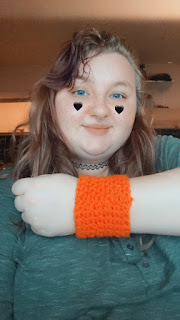
  Free Pattern: Us 5.5 mm or 5.00 mm crochet hook Size 4 medium worsted weight yarn Start by chaining 24, connect to the first chain with a slip stitch to start working in a round. Row 1: Chain 1, place a single crochet into each chain. Slip stitch into the first single crochet to complete the row. Row 2: Chain 1 and place a single crochet into every stitch. Slip stitch into the first single crochet to complete the row. Row 3-12:  Repeat row 2 for 10 more rows. Slip stitch and fasten off.  This is a very simple pattern but so much can be done with it. I was trying to make a cosplay when I first came up with the idea to do a cuff. Obviously, I'm not the first person to make cuffs but I had never thought about it before. So some things you can do with this design, you can place little designs on top or change color within the design to create a pattern. I will be posting a few designs that I came up with for this cuff but it is completely customizable which makes it so fun for cosp

Crocheting And ADHD/ADD

Image
I have both ADHD and ADD (I think they are the same thing but who knows). I am not sure which but it can be hard to focus on one thing for so long. This brings the question of how can I crochet when crocheting is a mindless task. I actually like mindless tasks but normally I can only focus for so long and then find another. I have a few theories on why crocheting works so well for me but also some things I just love so much. Finding a stitch/pattern It has taken me many years but I found a stitch that most of the time I don't get bored of. Which happens to be the granny stitch. This is so relaxing to do and once I get started it's easy to get lost and have fun. Seriously explore different types of stitches and ways to crochet things, I spent years on a single crochet stitch blanket because I could not focus on it. Now I can pop out multiple blankets if I want to focus on them because I found a pattern/stitch I love and that keeps me going. I do still love doing things with sin

What's In My Crochet Bag

Image
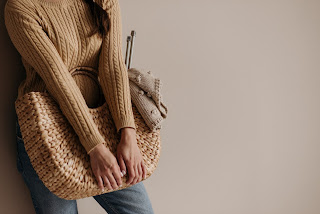
I actually have a few crochet bags but I am going to be talking about my main one today. It is a small clear bag that I keep all my essential crochet tools in that is small enough to fit into a purse or bag of any kind. I am just gonna list everything inside and why I have it, in case there is any confusion on why I consider it essential. I really do recommend having some sort of set of tools. Even if you are just starting out because maybe you get lost or forget something or lose something. Even if it is not a bag specific for your tools, try and keep all your stuff together it really helps. I personally like having a handheld bag because I can stick it in my backpack to bag when I go somewhere and all I have to grab is a ball of yarn and I can figure out a project on the way if I don't already have one laying around.  Hooks - This one is obvious, when you crochet you need hooks because that's the whole basis of crocheting. I also happen to keep my loom knitting tool so I don

Temperature Blanket 2021

Image
If you might have seen last year I made a post about a temperature blanket. and it failed miserably. I started way late in the year and was already behind and I wasn't motivated with the style and I made my own chart, which was a good chart in theory. But I realized soon that it wasn't actually the best idea. It was evenly spaced between high and low. But the temperatures here don't get super hot or super cold and the two months that I did do last year were all green except for maybe less than 10 rows of other colors. It just didn't look good and it is because where I live it doesn't really get higher than the  80 nor really lower than 40. Like currently in January we are in the middle of winter it is still not even the second to lowest color on my new chart.  This year I wanted to do something different and I set it up to use a stitch that I will enjoy because I always enjoy it. I would defiantly recommend making yours based on your average temperatures and stitche

Toilet Paper (In Case 2020 Ever Happens Again)

Image
  Free Pattern: Us 5.5 mm or 5.00 mm crochet hook Size 4 medium worsted weight yarn Chain 13  Row 1: Working into the second chain from the hook place 12 single crochets down the chain. Chain 1 and turn. Row 2-70: Work a single crochet into each stitch, chain 1, and turn. after the last row fastens off and wrap around some sort of tube for a perfect toilet paper effect. (12)  Now this one is special. It is a small and simple pattern but it has a lot to say. 2020 was a long year and if you remember about a year ago from now we went into lockdown. I mean I do not know how you could forget and for once it is not just a one-country kind of thing, it was worldwide. And no I am not going to go into politics because that is not what this page is about. But the main thing I remember when covid started was my friend tagged me in a post with crochet toilet paper and I thought it was funny but had no reason to make it. Funny enough I wanted to make it as a gift for my friends and I came up with

Spiral Granny Circle Bag Pattern

Image
Free Pattern: Us 5.5 mm or 5.00 mm crochet hook Size 4 medium worsted weight yarn This is worked with granny square stitches, when finishing the row where you are attaching to the opposite color you are currently working with, instead of chaining two, place a half double crochet into where you would normally connect, chain 3, and work 2 double crochets into the space created by the half double crochet keeping the color connected to itself to create the spiral. You will make two for either side of the bag. Magic circle or chain 4 and slip stitch into the first chain. Row 1: Work 6 granny square clusters (3 double crochets separated by chaining 2) into the circle. ( do half in one color and a half in the other, so not fasten off the yarn, finish one row at a time by going back and forth between the colors.) Row 2: Increase every space by working two granny clusters into each opening. Row 3-4: Work a regular granny cluster into each chain two space. Row 5: Repeat row 2 and increase all op

Pentagram Bag Pattern

Image
Free Pattern: Us 5.5 mm or 5.00 mm crochet hook Size 4 medium worsted weight yarn  Magic circle or chain 4 and slip stitch into the first chain. Row 1: Chain 3. Work 2 double crochets. Chain 5. Work 3 double crochets. Chain 5. Repeat until you have 5 clusters/openings. Row 2: Work a single crochet into each previous double crochet. In chain 5 work 3 single crochets, chain 2 (this is the point of the star), work a single crochet back into the third single crochet and work 2 more single crochets into chain 5. Repeat all the way around the star. Row 3 (this is where I would change color to the base color of the bag to give the look of a pentagram): Chain 3. Work a triple crochet, then 2 double crochets, then a half double crochet, then place two single crochets into the point of the star. Continue on by working a half double crochet, 2 double crochets, 2 triple crochets, 2 double crochets, a half double crochet, and two singles into the point of the star and repeat.  Row 4 (this is wher

Classic Socks Pattern

Image
  Free Pattern: Us 5.5 mm or 5.00 mm crochet hook Size 4 medium worsted weight yarn Magic circle or chain 4 and slip stitch into the first chain. Row 1: Working into the circle place 6 single crochets. Row 2: Increase each stitch by placing 2 single crochets into each stitch. (12) Row 3: Increase each stitch again and put two single crochets into each stitch. (24) Row 4-8: Place a single crochet into each stitch working in a round. (this is the part I consider the toe and would change to the base color after row 8) Row 9-24: Repeat row 4. (this is 16 rows for the main part of the foot and where I would change color for the heal. Row 25: Single crochet into the next 13 stitches and chain 1. You will be turning and working up these 13 stitches.  Row 26-32: Place 13 single crochets working up a little square. (8 rows for the heal) Row 33: (this is where I would change back into the base color) Slip stitch one side of the square to the other side (the 1st stitch and the 13th stitch) crea

Reversible Octopus Pattern

Image
Free Pattern: Us 5.5 mm or 5.00 mm crochet hook Size 4 medium worsted weight yarn Make two for the two faces/sides you want.  Magic circle or chain 4 and slip stitch into the first chain. Row 1: Work 12 single crochet into the circle. Row 2: Increase all stitches by working two single crochets into each stitch. Row 3-9: Work a single crochet into every stitch continuing to work in a round.  Round 10: Decrease all stitches with a single crochet by combining two single crochets together Row 11 (tentacles): Single crochet, work 8 double crochets into the next stitch, single crochet into the next, and repeat.  Row 12: Invert both octopuses and tie their ends (from the magic circle) together so their heads will not deflate. Then aline the two octopuses where one is stuffed in the other you will single crochet all the way around the bubble legs, connecting the two. By switching your hook into both stitches from each octopus and then place single crochet. (you can also slip stitch this but

Kitty Collar Pattern

Image
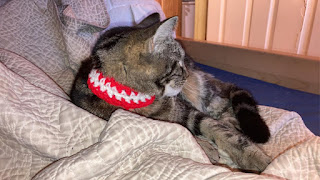
  Free Pattern: Us 5.5 mm or 5.00 mm crochet hook Size 4 medium worsted weight yarn Chain 25 (or 10 inches) and connect with a slip stitch into the first chain. We will be working in a round. Row 1-5: Work a single crochet into every stitch. You can make it longer or shorter if you please but I thought this was the perfect size for my average healthy cat.  My cat is one of my favorite people and I have always wanted to crochet her something but a lot of patterns normally are for dogs. I did try a hat pattern a while back and it was a big fail but I have a few ideas and know more since I have made that so you might see a cat hat soon. But anyway I could not find a good regular color for cats, I wanted to make something that she could actually wear day to day. Something simple that I could also change for different seasons and holidays. This is not tight at all so if she did get stuck she would absolutely be able to get out, it is not meant to hold tags or anything like that, it is jus

Pouch Bag Pattern

Image
Free Pattern: Us 5.5 mm or 5.00 mm crochet hook Size 4 medium worsted weight yarn Make 2 of these Make a magic circle or chain 4 and slip stitch into the first chain. Row 1: work 13 single crochets into the circle working in a round. Row 2: Work 2 triple crochets into each stitch. Row 3: Place a granny square cluster (3 double crochets with chain twos between each cluster) between every 2 triple crochets (13 granny clusters all around) Row 4: Work a granny cluster into each opening all the way around. (13) Row 5: In each opening place 4 double crochets, chain 2, and repeat. (13) Row 6: Place 2 double crochets between every 2 double crochets. (in the opening and the middle of each 4 double crochet clusters.) (26) Row 7: Work a regular granny cluster in each opening. Fasten off the first circle here. (26) Row 8(with both circles done): Place both circles together, lining them up flat. We are going to be working on the sides of both connecting them. Place a single crochet into each doub

Classic Gloves Pattern

Image
Free Pattern: Us 5.5 mm or 5.00 mm crochet hook Size 4 medium worsted weight yarn Magic circle or chain 4 connecting to the first chain with a slip stitch. Row 1: Place 5 single crochets into the circle Row 2: Increase all stitches by placing 2 single crochets into each stitch (10) Row 3: Increase all stitches again by putting two single crochets into each stitch. (20) Row 4-20: Place a single crochet into each stitch working in a round. Row 21: Place one single crochet. chain 5. Skip 5 stitches and place a single crochet. Work a single crochet all the way around (this creates an opening for your thumb.) Row 22-25: Place a single crochet all the way around (one single crochet in each chain as well) (20) Row 26:  (this is also where I would change color for the cuff) You are going to decrease on both sides of the glove, you can decide where you want that what I did was combine the first two stitches, work 8 single crochets, combine another 2 single crochets, and finish working my way

Why Are Mistakes Important?

Image
  If you know anything about crocheting or knitting you know that comes with mistakes. And honestly, I love my mistakes. Well to a point. I have spent years perfecting my craft and even after 8 years there are still people who are better than me, but I think that's always the case or at least everyone feels that way. Every single pattern and thing I have crafted, there has been at least 1 if not many many failed attempts. For the first 5 years, I could not even make a straight-sided blanket. But with every mistake, I have gotten better and better and honestly so much better than I ever thought I would be. I actually made something today that I am just so proud of myself, over the moon proud of myself. There are only maybe less than five patterns online and they all require tons of adding and sewing and it was just something I would not have fun with, but I made my own pattern that is fun and looks amazing. As I digress I have learned so much and with every mistake, I make normally